
Pitched Battle AAR
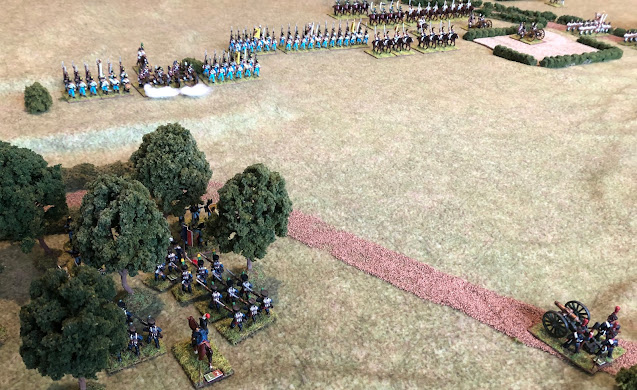
Setup for a random battle between French and Austrian forces. The objective is the town in the centre of the battlefield. The Austrians (bottom of photo) have a start position closer to the centre, while the French (top of photo) will have to advance into a deployed position.
The better defensive position for the Austrians is offset by the stronger French leadership, the Guard reserve and horse artillery attached to the Cavalry Divisions.
The battlefield is criss-crossed by fordable rivers with 4 bridges providing crossings for artillery.

Turn 1
The opening turn sees the French push forward on the left, right and centre while the Austrians take the town and hold back on each flank. The photo below shows the Austrian infantry occupying the town with light troops moving into the woods to the left.

On the French left, cavalry crosses the bridge to secure it for the following infantry and artillery. Austrian cavalry pushes up in response and the Austrian artillery moves up to the try and cover the bridge approaches.

In the centre, French artillery quickly deploys beside the the village in the foreground. French columns move forward over the fields with the Guard in reserve on the hill behind them.

On the French right flank, the French tactics mirror their left flank with cavalry moving to take the bridgehead and infantry following up to cross the river.
The Austrians have deployed their artillery and cavalry forward, ready to counter any cavalry threat. A lack of command rolls has limited any advance of the Austrian infantry.

Turn 2
The French left flank stumbles as they cross the river. The advance Dragoon brigade met a barrage of long range artillery fire from the Austrians on the hill and scampered back across the river leaving their accompanying horse artillery behind!
Austrian Jagers have now occupied the woods on the left while the rest of the Austrian line sits patiently.

In the centre, the French take the village on their side of the river and with their artillery set up, let go the first barrage on the town opposite. An Austrian battalion retires from the first shot and with friendly units blocking their path they took several hits. The second French battery took aim at their opposing artillery and one of the Austrian batteries retires out of range.

The first melee action happens on the French right flank as the Austrian light cavalry takes the initiative and charges the Bavarian cavalry regiment that has pushed across the river. The French counter-attack. With their leader in support, the Austrian cavalry get the upper hand and the Bavarians retreat in some disarray. Both sides have taken casualties and the Austrian commander has been wounded in the melee but the move has put a dent in the French advance.
Taking advantage of the situation, an Austrian infantry brigade has moved up on the lee side of the hill with the windmill while the Austrian artillery pounds the advancing horse artillery and inflicts a hit on them.

Turn 3
The French left flank reorganises it's advance with the Austrian artillery making any crossing of the bridge quite difficult. Two battalions of light infantry head towards the woods on the left with lancers following up behind. The left flank French artillery move up towards the centre of the battlefield and position themselves on the banks of the rivers to get a better field of fire on the Austrian defense.

Taking advantage of the Austrian disorganisation following the French artillery barrage, two French battalions race up the road and manage to close on the town without the Austrians getting a shot in. Two more battalions cross the rivers to the right of the bridge.
The Austrian artillery get a lucky shot in on their French counterparts and one of the French batteries pulls back from the river. With the support of the left flank artillery, the French are trying to form up 4 batteries right in the centre of the battlefield protected by the river.

The cavalry action on the French right flank continues to go in the Austrians favour. Another charge by the Austrian lights routs one of the Bavarian light cavalry regiments. The French lancers follow up forcing the French horse artillery to abandon their guns and flee back across the bridge.
The French respond by sending their whole cavalry division over to protect the flank of the advancing infantry.

It's only early but the Austrians have done a great job at holding up both flank advances by the French. As a result, the French have pushed hard towards the centre trying to find any Austrian weakness there.


Turn 4
The French advance into the woods on the left flank, coming into contact with the Austrian Jagers. The main Austrian line on this flank just waits patiently, their artillery and cavalry nicely positioned to counter any frontal assault.

Little headway is made by the French on the town as the Austrians hold firm. The French have now deployed two more batteries opposite the town and will soon begin a formidable barrage. The French Guard reserve remains on the hill in the background.

On the Austrian left flank some deadly close range artillery fire has sent the Austrian cavalry packing. One regiment is in full rout at the bottom of the photo. The Austrian Cavalry Division leader has also been wounded a second time from the fire. The Bavarian infantry continue their rather ponderous crossing of the river.

Turn 5
The French and Austrian light troops battle it out in the woods on the French left flank.

The fight for the town starts in earnest with the French artillery pounding the defenders.

The French push all their cavalry across the river to support the infantry attack slogging towards the windmill. The Austrians have rallied most of their cavalry in preparation for the next assault.

Turn 6
The French light get the better of the Austrian Jagers in the woods, sending then fleeing up the hill. The Austrian artillery fires at the French as they reach the edge of the woods.

The Austrians get the better of the melee in the town and a French battalion routs back across the river. Austrian Jagers hold up the French infantry trying to get past the town through the woods. A barrage from 4 French batteries puts two Austrian infantry battalions in retreat to the left of the town.

The crossing of the river is quite a challenge for such a large group of cavalry and the French will take a while to reform for their assault. The Bavarian artillery crosses the bridge and sets up to support the cavalry attack. The opposing Austrian artillery is concentrating it's fire on the infantry advance, causing one of the brigades to falter. The second brigade continues past the windmill to engage the forward Austrian position on the hill.

Turn 7
The French burst out of the woods to attack the Austrian right flank. The Austrians have reinforced the flank with a regiment of light cavalry.

The second French battalion invests the town after routing an Austrian battalion. The Austrian command leader is wounded in the battle and retires. The Austrians reinforce the town and also commit their grenadier reserve to shore up the centre and try and retake the town. The French artillery continues to pound the Austrian infantry and artillery, scoring hits on both.

The French cavalry are across the river and charge across the open field with horse artillery in support. The Austrian infantry open fire on the advancing Bavarian infantry and force both units back.

Turn 8
After initial French success with the infantry attack on the hill, the Austrians counterattack and retake the lost ground. The Austrian light cavalry is now positioned to threaten the French flank. In the background, the French cavalry and infantry cross the river.

The French have the town! But the Austrians are bringing up their reserve to help and the Austrian Jagers are holding firm in the woods. Sensing the time is right, the French Guard have advance down from the hill (top of photo) and are moving to support the attack on the town.

The French cavalry are halted by savage artillery fire, and the Bavarian infantry slowly set themselves up for a second assault.

After 8 turns, the situation is evenly balanced. The Austrians have blunted the attacks on both flanks, but the French have got the upper hand in the centre.
Turn 9
The Austrians defend stoutly on their right flank as a French battalion routs into the woods. The Austrian cavalry moves up to support their flank. The Austrian cavalry attempt a daring charge over the open fields in the centre of the photo. The French dragoons counter-charged and sent the Austrians back to their line. The French cavalry have taken more than their share of losses in the melee and now sit quite exposed despite winning the melee.

The Austrian Grenadiers from the reserve attack the town but the French hold steady.
The massed French artillery take their toll on their counterparts with one of the Austrian batteries routing. The French General in the centre is recovering from severe wounds suffered in the initial defense of the town. This has hampered the Austrian response and with the lack of leadership many of the units are near breaking point.
The French Old Guard cross the river in the foreground, aiming to drive a wedge between the Austrian centre and left.

The action really hots up on the French right flank. A series of cavalry charges results in both sides suffering heavily with regiments routing on both sides. The Austrians end up still in control of the high ground.
The Bavarian attack around the windmill steps up as musket fire is exchanged between the two lines.

Turn 10
The Austrians continue to hold firm on their right flank. With their artillery dominating the flank, they have pinned the French at the base of the hill and in the woods. A lone French horse artillery battery supports the French attack but it has proved ineffective so far. The remaining French infantry have diverted into the woods as the only protection from the artillery fire.

In the centre, a daring followup by Austrian dragoons against the French dragoons in the open area to the left of the town has resulted in a blood bath with both regiments fleeing the field. The French have been able to rally their cavalry as they crossed the river.
The massed French batteries have taken their toll on the Austrian artillery. One battery is in rout while the other has retired.
But there has been success for the Austrians in the town! The Austrian Grenadiers clear out the French in the town and have retaken it.

The French lick their wounds on the right flank, retiring their cavalry after suffering heavily at the hands of the Austrian cavalry and artillery on the hill. The Austrian cavalry have lost one unit but have quickly rallied the rest of the Division.
The battle for the windmill continues with both sides trading volleys at long range. The French Old Guard have now crossed the river to the left of the windmill and are threatening the Austrian infantry flank. However, the Austrians still have a Grenadier brigade in reserve over the bridge at the top left of the photo, which can be brought up to counter the French Guard.

Turn 11
The French continue to be pinned on the left flank with mounting losses and little artillery support.

The French try a second assault on the town but the Austrian Grenadiers repulse the attack and reclaim the whole town. A French battalion continues it's rout over the river.

The only signs of hope for the French come as the Old Guard march up the slope and crash into the flank of the Austrian line defending the hill with the windmill. An Austrian battalion routs leaving the remaining defenders suddenly exposed to the Bavarian Division opposite.
In the background, both sides cavalry rally their respective forces.

Turn 12
Austrian artillery fire forces the French to abandon the woods. A French infantry battalion and cavalry regiment are pinned at the foot of the hill by the artillery batteries. In desperation, the French bring up a horse artillery battery but it has proved ineffective so far.

The Austrians consolidate their hold on the town and are slowly rallying their forces to defend any counter-attack. The French, however, are licking their wounds with heavy casualties from the initial assault. French artillery focus their attention on the town to little effect.

The Austrian reserve lancers charge to the rescue over the bridge joining the Austrian centre and left. The Austrian infantry defending the hill have been soundly routed by the lead Old Guard battalion with more Guard units following up. The Austrians also push another battalion across from the left to support the lone defending unit.

On the Austrian far left flank, both sides are still recovering from the heavy losses in the initial cavalry melee. Both sides artillery trade blows at long range.

Turn 13
On the Austrian right, the French horse artillery score a lucky hit on an Austrian infantry battalion which routs. But the French are in no position to followup the success.

The Austrian cavalry are met by French Carabiniers who suffer heavily at the ends of the Austrian lances. Both cavalry units hold firm with supporting squadrons ready to assist.
The Austrian infantry have rallied in the foreground but the battalion sent for support falters and retires back. This leaves a lone battalion at the mercy of the Bavarians and the Old Guard!

Turn 14
On the Austrian right flank, a full barrage of artillery fire at close range sends the pesky French horse artillery into headlong rout. The horse artillery manage to rally before crossing the bridge.
In the foreground, an Austrian infantry battalion continues it's rout.

The Austrian centre maintains it's strong hold on the town as the focus turns to the battle to the left of the town. In a brave attack, the Austrian lancers rout the French Carabiniers but are in turn pushed back by the French Mounted Grenadiers.
The initial success of the lancers also resulted in them plowing into the Old Guard battalion, sending it routing with their cavalry partners. This battalion can be seen in the distance about to cross the river near the small woods.

The French artillery get the better of the duel with their Austrian counterparts allowing them to push up their cavalry in preparation for another assault.

Turn 15
Little action in the centre or Austrian right flank this turn. Both sides attempt to recover losses.

The Austrian left flank, however, is under increasing pressure as the French cavalry pushes forward onto the hill after getting the upper hand in a short melee.
The Bavarian infantry have now cleared the hill and have firm control over the windmill. Meanwhile the Old Guard rallies their bloodied troops to renew the attack.
Overall, it's a pretty even battle with the Austrians holding the central town and the French taking the small village and windmill on their right flank.

Turn 16
The French have almost given up the attack on their left flank and centre as the day draws to a close.

The French try a final series of attacks on their right flank. The cuirassiers have mixed success with several squadrons routing but the remainder of the regiment scatters the Austrian dragoons to the woods and almost off the table.
The Austrians have brought their artillery back up and tightened their defense, ready for the advancing Bavarian Division.
The Austrian Reserve Grenadiers attempt a charge across the bridge into the flank of the advancing French Guard. A Guard battalion turns to face them and after another bloody exchange, the Austrians retreat back to join the rest of the reserve.

Turn 17
French lancers charge up the hill and force back the leading squadrons of Austrian hussars. The lancers followed up but were met solidly by the second line of hussars and were sent packing themselves.
The French infantry have cautiously moved to the front of the woods, hoping the cavalry attack would provide an opportunity to renew the attack on the hill.

As darkness approaches, the French attempt a second attack on the town, pushing a battalion into the town. A bloody melee ends inconclusively.

The French attack continues on the Austrian left flank. French cuirassiers are held off by Austrian lancers but the French have brought up a whole regiment of dragoons.
The Austrian artillery is disrupted by fire from the French artillery reducing their effectiveness by half. The French artillery also score a decisive hit on an Austrian battalion which breaks and flees
A Bavarian infantry battalion charges the Austrian line, weathering the defensive fire and routing the defenders. A French Guard battalion then charges in support of the Bavarian infantry and sends another Austrian unit into rout. The Austrians are now in deep trouble with three battalions routing and will lose at least 1 unit off the table next turn.

Turn 19
The French lancers charge up the hill and send the Austrian cavalry into retreat. A French infantry battalion advances with the protection of the hill as the Austrian flank becomes exposed.

The Austrian Grenadiers secure the town for the second time as the French attackers rout over the river. A second French battalion moves around the right of the town hoping to cut off the defenders.

The whole Austrian left flank is in complete rout off the table! The Old Guard battalion has almost reached the other side of the table (foreground).

Turn 20
The last turn. Both French and Austrians try some last ditch charges on the Austrian right flank. The Austrians end up routing the French lancers and placing the French attack in serious danger. It's a hollow victory but salvages some pride and would allow an orderly retreat of the remainder of the Austrian army during the night.

The Austrian Grenadiers fail to hold the town after a third assault by the French. Two French battalions now hold the town at the end of the game, securing the major objective on the table.

The French advance on the Austrian left. If night hadn't arrived they would have looked to sweep around over the river into the Austrian centre.

The final view of the whole battlefield below.

The end result is a decisive victory for the French.
The French score was:
- 10 points (major objective - town)
- 5 points minor objective - windmill)
- 85 points (17 units routed)
- 16 points (16 hits on units)
- Total = 118 points
- 38 points (38 hits on units)
- Total = 38 points
Thanks for the fabulous AAR! What a beautiful battle! May I ask, who makes the river? I have been in search of a good river for some time now and this looks like the perfect thing. Thanks!
ReplyDeleteBest,
Justin
I first created a set of modular rivers using clear acetate sheets painted blue underneath and with gloss medium gel dappled on to give a water surface effect. I then brushed some of the medium gel along the edges of each river and stuck on some flock and static grass. I then place river banks matched to each river section underneath a cloth mat to give the impression of depth. Here's a link to a post with the river technique - https://vomkriegewargaming.blogspot.com/2020/05/3d-modular-rivers.html
ReplyDeleteThanks for the response! Great to know. I may try to make some of those myself one of these days. They sure look nice!
ReplyDelete